Tahini Butter Cookies

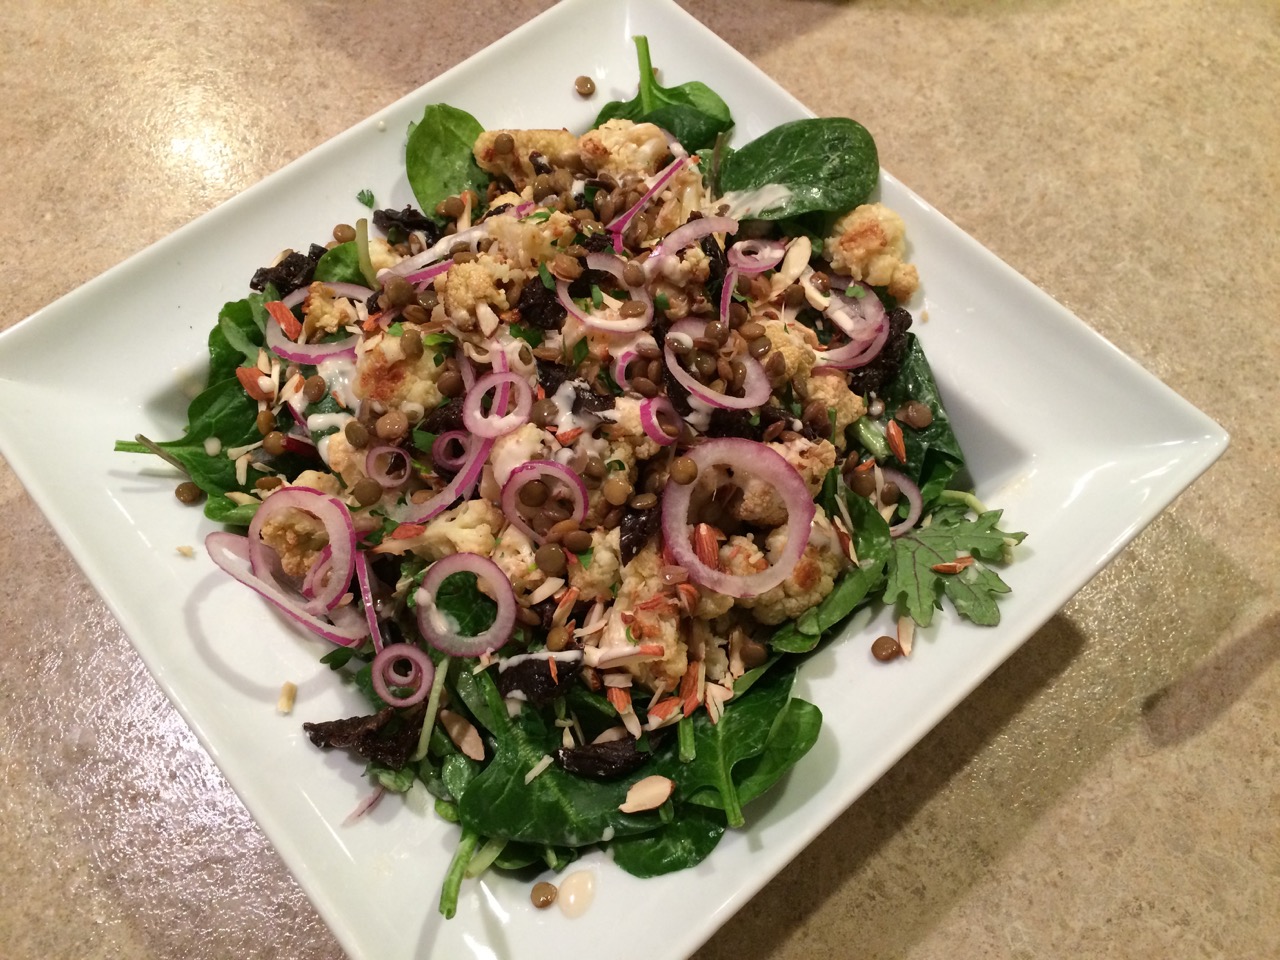
I believe I've mentioned it before, but that won't stop me from saying it again, I LOVE tahini. Over the past several years I've begun to use it more and more in all sorts of things. My first real introduction to tahini was when I started making my own hummus. I'm sure a lot of other people have the same experience. While I liked it well enough at that time, it wasn't until I'd been using it for a while that I truly fell in love. Now I could use it in almost anything. It's great in salad dressings (check out this salad for an example), sauces, and granola to name just a very few. One of my favorite uses is as an alternative to peanut butter on a piece of toast. Slather on the tahini and drizzle with a touch of honey, it's a heavenly combination. 

And yes, tahini is definitely a great addition to cookies! I've been wanting to try this for a little while now, so I had a free morning this week and I whipped up a half batch of these wonderful tahini butter cookies. They are simply wonderful, especially for someone who loves tahini as much as I do. They are incredibly tender and buttery (surprisingly very reminiscent of these snowball cookies) and are covered with a sweet coating of powdered sugar and cinnamon that bakes into a moist and tender crust on the outside, almost like a built in icing. And as for the flavor, the tahini really shines through. It's savory nuttiness is a wonderful contrast to these sweet and delicate morsels. If you already love tahini like I do, or even if you've never had tahini in your life, you must make these cookies!

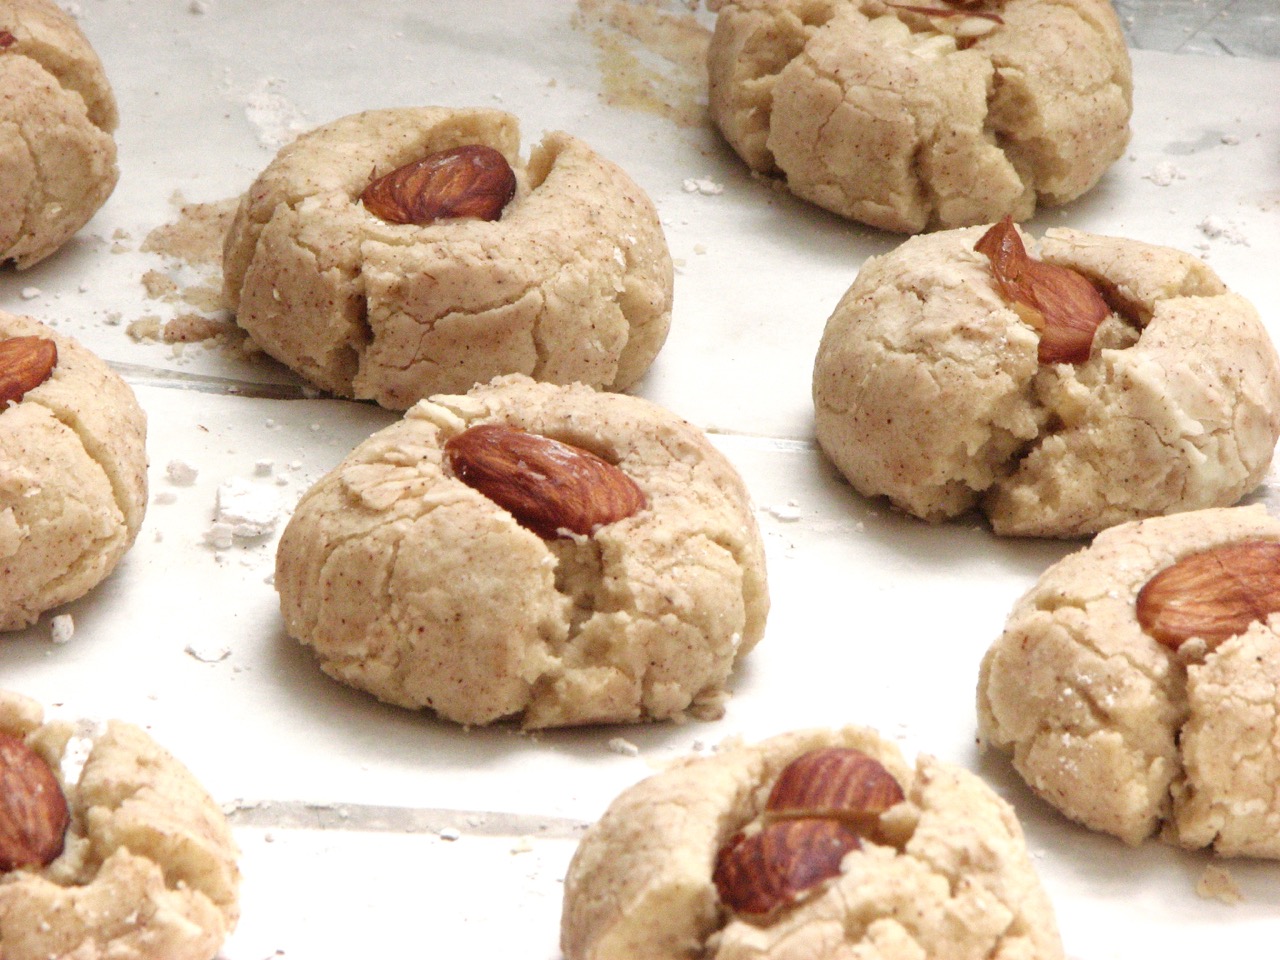
It often happens that I'm just too lazy to get out an extra bowl and pull out a few extra ingredients to make toppings, or icings, or coatings for various things, but I managed to find the energy to pull out the powdered sugar and cinnamon to roll the dough in before baking these cookies and I'm so glad I did. It really added a lot to the cookies, both in texture and flavor, so I highly recommend this additional step. I also thought the almond pressed into the center of the cookie was just too cute to skip, I think it really elevates the look of the cookie, but of course you wouldn't have to add them to the top if you don't want to or don't have any almonds laying around. They will still be wonderful without it.


Tahini Butter Cookies
From Pretty. Simple. Sweet
Ingredients

  • 1 cup (140 g/5 oz) all-purpose flour, sifted
  • ½ teaspoon baking powder
  • ½ teaspoon ground cinnamon
  • Pinch of salt
  • ⅓ cup (75 g/2.6 oz) unsalted butter, at room temperature
  • ⅓ cup plus 1 tablespoon (80 g/2.8 oz) granulated sugar
  • ⅓ cup plus 1 tablespoon (100 g/3.5 oz) tahini
  • 3 tablespoons powdered sugar mixed with 1 teaspoon ground cinnamon, for rolling
  • Whole almonds, for garnish

Directions
In a medium bowl, combine flour, baking powder, cinnamon, and salt. Set aside.

In a mixer bowl fitted with the paddle attachment, beat butter, sugar, and tahini on medium-low speed for 1-2 minutes until creamy. Add flour mixture and beat on low speed just until combined, scraping down the sides and bottom of the bowl as needed. Place dough in the refrigerator for at least 30 minutes to firm up before shaping.

Preheat oven to 350 degrees and line a pan with parchment paper.

Using an ice cream scoop or level tablespoon, drop rounded balls of dough, about 1 inch diameter (15-20 grams each). Roll in powdered sugar-cinnamon mixture and place onto prepared baking sheet. Set an almond in the center of each ball, gently pressing to slightly flatten the cookies (they don't spread a lot during baking so make sure to press them down as well as you can without causing them to crack open.)

Bake for 12-14 minutes, until cookies look cracked and just begin to brown at the edges. Leave to cool for 10 minutes, then transfer gently to a wire rack to cool completely.

Roasted Cauliflower and Lentil Salad with Lemony Tahini Dressing

This is a salad that I actually made a few months ago and am now getting around to posting about. Just because it took me a little while to post it though does not mean that it wasn't a fantastic salad. I had been looking for a hearty winter salad to bring to a family gathering. I wanted something seasonal but not the typical cranberry walnut apple salad or Brussel sprout and butternut squash salad. These are all absolutely delicious, but I was in the mood for something a little different. 

The recipe caught my eye because it used cauliflower, which I love, that is roasted with some of my favorite spices and topped with a creamy and lemony tahini dressing that is simply scrumptious. A few lentils are thrown in to add heartiness, some dried fruit, toasted nuts, and red onion finish the whole thing off. It came together beautifully, the perfect combination of flavors and textures, a perfect winter salad. 

Since I was serving this salad to a group of people that have some food intolerances, including dairy, I didn't worry about adding any cheese, but I have no doubt that a little crumbled feta would really be amazing in this recipe. This recipe was made as a side dish, but it also makes a great complete meal. With the lentils for protein mixed with the vegetables, fruit and nuts and a nice tahini dressing it really has everything you need. 


Roasted Cauliflower and Lentil Salad with Lemony Tahini Dressing
Adapted from Foolproof Living
Ingredients
For the salad:

  • 1 medium-sized head of cauliflower, cut into small florets
  • 3-4 tablespoons olive oil
  • 1/4 teaspoon ground cumin
  • 1/4 teaspoon ground cinnamon
  • 1/4 teaspoon ground ginger
  • 1/4 teaspoon ground cayenne pepper 
  • 1/2 cup uncooked green lentils
  • 3/4 cup sliced almonds
  • 10-12 Medjool or 8-10 prunes, sliced thin
  • 1 small red onion, sliced thinly into half moon slices
  • 2-3 cups of mixed greens or chopped green lettuce, rinsed
  • Flat leaf parsley or cilantro for garnish, optional

For the tahini dressing:

  • 1/4 cup tahini
  • 1 1/2 tablespoons honey
  • juice of a lemon, freshly squeezed
  • 2-4 tablespoons of water thin (or more based on the consistency you prefer)
  • 1/2 teaspoon zat'ar seasoning
  • Salt and pepper

Directions
Preheat the oven to 425 degrees. Line a baking sheet with aluminum foil. Place the cauliflower florets in a large bowl. Whisk together the oil and spices. Pour over the florets. Give it a large stir making sure that most of the florets are covered with the mixture. Distribute them evenly on the baking sheet and roast for 25-30 minutes, stirring halfway through, until tender and beginning to brown. Remove from oven and set aside to cool.

Place lentils in a small pot and cover it with 2 cups of water. Bring it to a boil and let it simmer for 20-25 minutes until tender. Drain and discard the water. Set aside to cool.

Meanwhile, reduce the oven temperature to 350 degrees. Spread the sliced almonds on a baking sheet and toast for 8-10 minutes in the oven, gently tossing them hallway through. Keep an eye on them as they can burn easily. Take them out of the oven and let them cool on the kitchen counter.

In the mean time, make the tahini dressing by whisking all the tahini dressing ingredients in a bowl. To assemble: Place the greens in a large salad bowl. Add in the roasted cauliflower, lentils, almonds, dates, and red onion slices. Drizzle it with the tahini dressing. Gently toss it while making sure that the dressing is distributed evenly within the salad.

Peanut Butter Snack Cake

 If you're a peanut butter fan (and let's be honest, who isn't? If you're allergic to peanuts I am very, very sorry), and you're looking for a fun baking project this week then I have just the recipe for you. This peanut butter snack cake is the perfect combination of tender, buttery cake mixed with the rich deliciousness of creamy peanut butter. The peanut flavor really shines through in this cake without being overwhelming, and the tender crumb of the finished loaf is delicate yet sturdy. 

I left my loaf plain and simple, but a handful of chocolate chips in the batter, or a drizzle of chocolate over the top once cool would no doubt be wonderful. Or if you're into the whole peanut butter and jelly thing, a swirl of homemade jam whirled into the batter right before baking, or a cup of fresh fruit  gently folded in would also be simply scrumptious. Customize to your hearts content!

I decided to halve the original recipe and bake my cake in a loaf shape, but the original recipe yielded a 7-inch double layer cake with chocolate frosting. So if that sounds more like your thing check it out at The Pastry Affair. A small loaf was just the perfect thing for me though. It baked up perfectly. I would say that you need to be certain to not over-bake this cake or it will turn out dry, and dry is never good. I always start out with a little less time on the timer than what the recipe calls for, that way you can be sure to check it out before it goes too long. Everyone's oven is a little different, so it never hurts to play it safe. 


Peanut Butter Snacking Cake
Adapted from The Pastry Affair
Ingredients

  • 1/4 cup (2 ounces) butter, melted
  • 1/4 cup (64 grams) creamy peanut butter
  • scant 1/4 cup (40 grams) granulated sugar
  • scant 1/4 cup (40 grams) brown sugar, packed
  • 1 large egg
  • 1/2 teaspoon vanilla extract
  • 1 cup + 2 tablespoons (280 grams) all-purpose flour
  • 1 teaspoons baking powder
  • 1/2 teaspoon baking soda
  • 3/8 teaspoon salt
  • 1/2 cup milk

Directions
Preheat oven to 350 degrees F (180 degrees C). Grease a loaf pan with cooking spray or butter and set aside.

In a large mixing bowl, beat together the butter, peanut butter, and sugars until uniform. Add the egg, beating well to incorporate. Mix in the vanilla extract. Gradually add in the flour, baking powder, baking soda, and salt. Mix in the milk, stirring until batter is uniform and smooth.

Transfer batter to loaf pan and bake for 30-35 minutes, or until a toothpick inserted into the center comes out with a few moist crumbs. You definitely don't want to over bake this cake or it will be dry. Transfer to a wire rack and allow to cool to room temperature.

Seedy Sourdough Crackers

I love making homemade crackers. Hang on, let me rephrase that; I love having homemade crackers on hand to eat. I have to admit I don't always love making them. But honestly, they're not that big of a pain to make, it just takes a bit of time, especially when you have a big recipe. But the end results are completely worth it and that is why I keep making different versions of homemade crackers again and again. 

This recipe is probably the best that I've made to date. I used a basic recipe for sourdough crackers that I've used in the past, but to add some interest to the crackers I added some seeds and grains, for flavor, texture and looks. Looking at what I had hanging around, I decided on poppy seeds, sunflower seeds and rolled oats. I coarsely ground the sunflower seeds and oats in a food processor for just a second or two before adding them so the pieces wouldn't be too big. The resulting crackers turned out delicious! Crisp and nutty with a slight tang from the sourdough. I highly recommend taking the time if you have it to roll out these addicting homemade crackers. 

You could use whatever seeds or nuts you have on hand to add to these crackers. Just be sure to grind up any bigger pieces so they incorporate better into the dough and make it easier to roll out. I used my pasta making to roll the crackers to an even thickness. I have found that this is by far the best way to roll out crackers, but that doesn't mean you can't roll them by hand with a rolling pin if you don't have a pasta machine. Just do your best to roll them as thin and as evenly as you can. You'll have to watch them a little more closely when baking too, to make sure they don't bake too unevenly.


Seedy Sourdough Crackers
Adapted from King Arthur Flour and Reformation Acres
Ingredients

  • 1 cup (4 ounces) whole wheat flour
  • 3/4 teaspoon salt
  • 1/4 teaspoon baking soda
  • 1/4 teaspoon baking powder
  • 3/4 teaspoon sugar
  • 1 cup (9 ounces) unfed sourdough starter
  • 4 tablespoons (2 ounces) butter, at room temperature
  • 2-4 tablespoons assorted grains and/or seeds (poppy seeds, sesame seeds, coarsely chopped sunflower seeds, coarsely ground oats, etc)

Directions
Place all of the ingredients in the bowl of a stand mixer fitted with the paddle attachment. Mix on medium low until everything is well combined into a nice, cohesive dough. Add a little extra flour if the mixture seems too wet and sticky. 

Assemble pasta maker. Roll small pieces of the dough through the machine until very thin (I went to setting 5 or 6 on my machine). Alternatively, you can use a rolling pin and roll the dough out on a well floured surface, trying as much as possible to roll the dough to an even thickness. Cut the dough out using cookie cutters, or use a pastry scraper to cut freehand. 

Place the cut shapes on a parchment lined baking sheet. Place the baking sheet in the fridge for a few minutes while you preheat the oven to 375 degrees (I find it easier to dock the dough when it has firmed up a little in the fridge, but this is not absolutely necessary). Sprinkle crackers with a little extra kosher salt if desired and use a fork or toothpick to poke a few holes in each cracker. Bake crackers for 12-15 minutes, until nicely golden brown and crisp all the way through. Watch them carefully toward the end as they can over cook quite quickly. Cool completely before storing in an airtight container. 

Polenta Breakfast Squares with Kale and Quinoa

Given the choice between a sweet breakfast or a savory breakfast, I will pick sweet almost every time. There is almost nothing I like better than sitting down in the early morning with a steaming cup of coffee and a delicious, fresh baked pastry. Scones, cinnamon rolls, danishes, muffins, you get the picture, that's my idea of the perfect breakfast. This, however, does not mean that a savory breakfast is never appreciated, on the contrary, some days a perfectly fried sunny-side up egg served over a piece of cheesy toast is ideal. Or a big plate of scrambled eggs, fresh bread and a side of breakfast sausage. I won't discriminate. 

This recipe came from one of those mornings when sweet wasn't at the top of the list. I was feeling like something hearty and savory. I liked the idea of a fancied up polenta bake so I added in a little bit of what I had floating around the fridge; onions, kale and some quickly cooked quinoa for a little extra protein, but you could really add whatever you'd like in the flavor department. It ended up being the perfect fix for my savory breakfast craving. 

I used a recipe I found on The Kitchn as a starting point for these squares, but then adapted it for what I wanted and what I had in the fridge. What I was really hoping for is that these squares would hold together when they were cut and not just fall apart in a crumbly mess. Thankfully they ended up holding together quite well, but I did end up waiting until after they were refrigerated and thoroughly chilled before cutting them up, just to make sure. 

I ended up finding that my favorite way to eat these squares was to broil them in the oven until crisp and hot, then topping each square with a generous piece of cheese and letting the residual heat in the oven melt the cheese to perfection. I nice drizzle of romescu sauce, a poached egg, or even a good spoonful of salsa would also be wonderful. The square reheat well so let your imagination go wild!

Polenta Breakfast Squares with Kale and Quinoa
Adapted from The Kitchn
Ingredients

  • 1/4 small onion, minced
  • 2 handfuls kale, chopped into small pieces
  • 2 eggs
  • 1 cup milk
  • 1 cup (158 grams) cornmeal
  • 90 grams quinoa, cooked according to package directions
  • 2 1/2 tablespoons grated parmesan cheese
  • 1/2 teaspoon salt
  • Pepper
  • 2 cups boiling water

Directions
Preheat the oven to 350°F and lightly grease a 9-inch square baking dish (or something of similar size).

In a skillet, heat olive oil over medium heat, add the onion and cook for 8-10 minutes, until the onion has softened. Stir in the kale and cook for a few more minutes until kale is starting to wilt. Remove the skillet from the heat and add the cooked quinoa, stirring to combine. 

Beat the eggs in a large bowl and whisk in the milk, then whisk in the cornmeal and 1 1/2 tablespoons of the Parmesan cheese. Fold in the cooked onion and kale mixture, along with the salt and a generous quantity of black pepper. Pour into the prepared baking dish.

Pour in the 2 cups of boiling water and whisk to combine in the dish. Bake uncovered for 60-80 minutes total. After the first 20 minutes, whisk thoroughly, moving the polenta from the edges of the pan in to the center, and moving the center of the polenta out, to ensure the polenta is baking evenly. Continue baking until the polenta looks firm and golden-brown on top, and a knife comes out clean. Sprinkle the remaining 1 tablespoons Parmesan over top while the casserole is still hot.

Serve warm, cold, or hot. The polenta will be fairly soft while hot, but will firm up as it cools. If you want nice, even slices, allow to cool and then refrigerate until chilled before cutting. 

Note: square reheat very well under the broiler; broil until nice and crisp on top, then top with a slice of cheese and allow to melt before digging in. 

100% Whole Wheat Blueberry Muffins

Oftentimes the simple basics are the best. That is certainly the case with these easy 100% whole wheat blueberry muffins. I was hankering for a good old blueberry muffin, but at the same time didn't want it to be completely devoid of nutrition. These muffins grabbed me with their 100% whole wheat title, and when I saw the modest amount of sugar and oil in the recipe I knew it was the perfect muffin to try. And no need to fear, they turned out wonderfully. With all whole wheat flour I was afraid they would be dense and dry but they actually turned out very light. They are perfectly sweet without being sugary and have a wonderful wheat-y nuttiness from the whole wheat flour. A touch of cinnamon shines through as the perfect complement to the sweet and juicy berries. 

As you can probably see, these muffins are not the gigantic muffins you might see at a bakery or coffee shop, they are a bit more modest in size than that. If you're feeling like something a bit bigger you could go ahead and fill those muffins tins a bit more and end up with fewer muffins in the end. 

Side story; I had decided to make these muffins one random morning that I had the day off. Since I don't need to make large batches for just myself, I decided to halve the recipe you see below. I do this all the time and rarely have any problems. All seemed to be going fine, until I tasted the finished batter that is. I thought to myself, 'hmm, these taste kind of oily.' I just figured the taste would bake out and they would be fine. 

Halfway through the baking however, as I was finishing up my dishes I suddenly had the epiphany that I hadn't halved the oil! I don't know why it popped into my head at that point and not when I tasted the oily batter, but no matter. Whatever the case the first batch was pretty much ruined. I let them finish baking and then took a look at them. They were heavy, dense and greasy as I'm sure you can imagine. I shed a (figurative) tear, slowly tossed them into the trash can, and pulled out my freshly washed mixing bowls to have another go at it. Sigh. The trials of a small batch baker. 

Don't worry, the second batch turned out great. And I made sure that I wrote down all the measurements this time, halved! 

100% Whole Wheat Blueberry Muffins
Adapted from King Arthur Flour
Ingredients

  • 2 1/4 cup (10 ounces) whole wheat flour
  • 2/3 cup (4.5 ounces) brown sugar
  • 3/4 teaspoon salt
  • 1 teaspoon baking powder
  • 1/2 teaspoon baking soda
  • 1/2 teaspoon ground cinnamon
  • 1 cup (4 1/2 ounces) blueberries, fresh or frozen
  • 1 teaspoon vanilla extract
  • 1/4 cup (2 ounces) vegetable oil
  • 1 1/2 cups (12 ounces) buttermilk or plain (not Greek) yogurt; or 1 1/4 cups (10 ounces) liquid whey leftover from making Greek yogurt - this is what I used

Directions
Preheat the oven to 400°F. Lightly grease the cups of a standard muffin pan; or line with paper baking cups, and grease the paper cups.

Whisk together all of the dry ingredients, including the blueberries. In a separate bowl, whisk together the vanilla, vegetable oil, and buttermilk or whey. Pour the liquid ingredients into the dry ingredients, stirring just to combine.

Spoon the batter into the prepared muffin cups, filling them nearly full. A slightly heaped muffin scoop of batter is the right amount. Sprinkle the tops of the muffins with coarse sparkling sugar or cinnamon sugar, if desired.

Bake the muffins for 16 to 18 minutes, until a toothpick inserted into the middle of one of the center muffins comes out clean. 

Remove the muffins from the oven, and after 5 minutes (or when they're cool enough to handle) transfer them to a rack to cool. Serve warm, or at room temperature. 

Yield: 12 muffins.

The Ultimate Winter Couscous and Homemade Harissa

While my photos of this wonderful winter couscous are not the best, don't let that stop you from giving this recipe a try. It's January, so by the time this meal finished cooking all my natural lighting was gone. But that didn't stop me from taking a few quick pics so I could at least remember how delicious this recipe was. It comes from one of my newest cookbooks, Plenty, by Yotum Ottolenghi. I've been a Ottolenghi fan for a couple of years now ever since I picked up his cookbook Jerusalem on a whim one day at the library and have been hooked ever since (I've definitely got a case of the creeping Ottolenghis). Every recipe of his that I have tried so far has been just so good, and this recipe was no exception. 

I don't know exactly what it was about this dish that hooked me, but I was flipping through the cookbook just a few days ago and stopped on this page, deciding then and there that I was going to make it. It looked and sounded like a perfect meal for a cold winter evening. It is healthy and hearty and full of fun new ingredients and ideas that I haven't really tried all the much before. Definitely a keeper, and something I would make over and over again. 

This recipe also gave me the chance to finally try making my own harissa, a hot chili pepper paste, which I've been wanting to do for a while now. It is delicious and I highly recommend grabbing a few peppers and making your own, but if you don't feel like it I have seen several jars of harissa at the grocery store. I've never tried any of them so I can't say how good they are but they do exist. 

The list of ingredients for this ultimate couscous does look a little long, that's pretty typical of a lot of Ottolenghi's recipes, but a lot of the ingredients are spices which, if you already have many of them on hand, means you won't have to buy quite as many ingredients. The main players here are some delicious winter vegetables that you cook up really easily in the oven along with some chickpeas and dried apricots. The whole thing is then served over buttery saffron coucous and topped with fresh cilantro. So. Good. 

This was my first time buying saffron. I have never wanted to spend that much money on a pinch of a spice before, but this time I just did it. No, saffron is not cheap, but yes, it did add such a wonderful flavor to the couscous that you just won't get without it. Can you still make this recipe without saffron? Sure, but it will be missing a little something. But don't let that stop you if you want to give this recipe a shot, it will still be delicious! 

Despite the long list of ingredients and instructions, this recipe is actually quite easy. Yes, chopping and prepping the vegetables takes a bit of time, once it's all prepped everything is very simple and a lot of it is hands off. If you prep the vegetables and harissa ahead of time and mix up the spices it actually shouldn't take that long at all. So if you're looking to try something new this winter, new combinations of vegetables and flavors, look no further, this is your recipe. 

All prepped and ready to go!

Homemade Harissa

The Ultimate Winter Couscous
From Plenty by Yotam Ottolenghi
Ingredients

  • 2 medium carrots, peeled and cut into 3/4 inch chunks
  • 2 medium parsnips, peeled and cut into 3/4 inch chunks
  • 8 shallots, peeled 
  • 2 cinnamon sticks 
  • 4 star anise
  • 3 bay leaves
  • 5 tbsp olive oil
  • ½ tsp ground ginger
  • ¼ tsp ground turmeric
  • ¼ tsp hot paprika
  • ¼ tsp chilli flakes
  • 2 1/2 cups (10 oz) pumpkin or butternut squash, peeled and cubed
  • 1/2 cup (75g) dried apricots, roughly chopped
  • 1 cup (200 grams) chickpeas (canned or freshly cooked)
  • 1 1/2 cup chickpea cooking liquid and/or water
  • 1 cup (170 grams) couscous
  • large pinch of saffron threads 
  • 1 cup boiling vegetable stock
  • 3 tablespoons (20 grams) butter, broken into pieces
  • 2 tablespoons (25 grams) harissa 
  • 1 ounce preserved lemon, finely chopped
  • 2  cups cilantro leaves

Directions
Preheat the oven to 375 degrees. Place the carrots, parsnips and shallots in a large ovenproof dish. Add the cinnamon sticks, star anise, bay leaves, 4 tablespoons of the oil, ¾ teaspoon salt and all the other spices and mix well. Place in the oven and cook for 15 minutes. 

Add the pumpkin/squash, stir and return to the oven. Continue cooking for about 35 minutes, by which time the vegetables should have softened while retaining a bite. Now add the dried apricots and the chickpeas with their cooking liquid and/or water. Return to the oven and cook for a further 10 minutes, or until hot.

About 15 minutes before the vegetables are ready, put the couscous in a large heatproof bowl with the remaining 1 tablespoon olive oil, the saffron and ½ teaspoon salt. Pour the boiling stock over the couscous. Cover the bowl with cling film and leave for about 10 minutes. Then add the butter and fluff up the couscous with a fork until the butter melts in. Cover again and leave somewhere warm. 

To serve, spoon couscous into a deep plate or bowl. Stir the harissa and preserved lemon into the vegetables; taste and add salt if needed. Spoon the vegetables onto the center of the couscous. Finish with plenty of cilantro leaves.

Harissa
Adapted from Plenty by Yotam Ottolenghi
Ingredients

  • 1 red pepper 
  • 1/4 tsp coriander seeds or 1/8 teaspoon ground coriander
  • 1/4 tsp cumin seeds or 1/8 teaspoon ground cumin
  • 1/4 tsp caraway seeds
  • 1/2 tbsp olive oil 
  • 1 small red onion, roughly chopped 
  • 3 garlic cloves, roughly chopped 
  • 2 medium-hot fresh red chillies, seeded and roughly chopped 
  • 1/2 tbsp tomato paste 
  • 2 tbsp lemon juice 
  • 2 to 3 tsp coarse sea salt

Directions
Put the red pepper on a very hot grill or under the broiler until blackened (15-20 minutes), turning as needed to blacken all sides. Transfer to a bowl, cover with plastic wrap, leave to cool. When cool, peel and discard the skin and seeds. Set aside.

Place a dry frying pan on a low heat and lightly dry toast the coriander, cumin and caraway seeds for two minutes. Transfer to a mortar and grind to a powder. (Skip this step if you only have ground spices.) 

Heat the oil in a frying pan and fry the onion, garlic and chillies over medium heat until dark and smoky - six to eight minutes. Cool slightly, then tip into a blender or food processor. 

 Add the remaining harissa ingredients, including the grilled pepper and ground spices, and blitz together to make a paste. Set aside until you are ready to use it.

No Bake Gingerbread Oat Bars

The new year has arrived, time sure does fly. A lot has happened in the past year, and a lot is going to happen in 2016. I can't believe that I am going to graduate this year and start residency. This is so exciting, and yet completely terrifying at the same time. One day at a time, that's the way to do it. 

Anyway, on to these no bake oat bars. I had been looking for a no bake oat bar to have on hand for a quick snack for those afternoons where you suddenly realize that you didn't eat enough for lunch. These are the perfect solution; hearty and dense, packed full of all those whole grain oats, chewy and perfectly sweet. I was in the Christmas spirit when I made these, so I added a little bit of molasses for that delicious gingerbread flavor. These bars sliced up beautifully, they won't crumble and fall apart on you like it seems so many no bake bars do. If you want a simple and delicious snack for the upcoming week, I highly recommend these tasty bars. 

Like I said, I added a bit of molasses to this recipe for a gingerbread flair, but if you'd rather not have that flavor, go ahead and replace the molasses with a little more honey. The melted chocolate on top makes these bars extra special, but if you're looking for something a little more simple you could always skip it, but I do highly recommend a little chocolate, it's just so good. And although I haven't tried it, I think you could easily add some dried fruit and/or nuts to the mixture for a little extra punch of flavor. I may try experimenting with that soon! Whatever you decide, enjoy!

No Bake Gingerbread Oat Bars
Adapted from Tutti Dolci
Ingredients

  • 3/4 cup (180 grams) cashew butter (or your favorite nut butter)
  • 1/4 cup (3 ounces) honey
  • 2 tablespoons (40 grams) molasses
  • 1/4 teaspoon salt
  • 1 teaspoon cinnamon
  • 1 teaspoon vanilla
  • 3 cups (240 grams) old fashioned rolled oats
  • 1 cup (15 grams) puffed kalmut
  • 1 cup chocolate chips
  • Sea salt for topping, optional

Directions
Line an 8-inch square baking pan with foil and spray with nonstick spray. Combine cashew butter, honey, molasses, salt, and cinnamon in a heavy saucepan over medium-low heat, stirring until melted and smooth. Remove saucepan from heat and stir in vanilla, oats, and puffed kalmut until combined. It will be very sticky and thick. Scrape mixture into prepared pan and use a spatula lightly coated with nonstick spray to press evenly into pan. Try to work quickly, it firms up as it cools. 

Place chocolate chips in a glass bowl and microwave in 15-30 second intervals until melted and smooth. Pour melted chocolate over bars and smooth with an offset spatula, then top with flaky sea salt if using. Place bars in the refrigerator and chill until set. Lift foil to remove bars from pan and place on a cutting board; cut into squares with a sharp knife.